 1
 2
 3
 4
 5
 6
 7
 8
 9
10
11
12
13
14
15
16
17
18
19
20
21
22
23
24
25
26
27
28
29
30
31
32
33
34
35
36
37
38
39
40
41
42
43
44
45
46
47
48
49
50
51
52
53
54
55
56
|
import cv2
import face_recognition
import numpy as np
import os
import re

# 人脸数据, 文件, 编码, 名字
files = os.listdir("./data/mans")
face_images = [0]*len(files)
face_encodings = [0]*len(files)
face_names = [0]*len(files)

# 获取编码和名称
for i in range(len(files)):
    face_images[i] = face_recognition.load_image_file('./data/mans/' + files[i])
    face_encodings[i] = face_recognition.face_encodings(face_images[i])
    if len(face_encodings[i]) > 0:
        face_encodings[i] = face_encodings[i][0]
    else:
        face_encodings[i] = None
    face_names[i] = re.findall(r'(.*)\..*', files[i])[0]
print(face_names)

# 人脸比较
# results = face_recognition.compare_faces(face_encodings[0], face_encodings[1])
# print(results)

# 人脸距离
# face_distances = face_recognition.face_distance(face_encodings[0], face_encodings[1])
# index = np.argmin(face_distances)
# print(index)

# camera = cv2.VideoCapture('./data/test.avi') # 从视频文件
camera = cv2.VideoCapture(0) # 从摄像头

while True:
    ret, img = camera.read()
    img = cv2.flip(img, 1)
    # img = cv2.cvtColor(img, cv2.COLOR_BGR2GRAY) # 灰度处理
    locations = face_recognition.face_locations(img)
    for top, right, bottom, left in locations:
        cv2.rectangle(img, (left, top), (right, bottom), (255, 0, 0), 2)
        sub_img = img[top:bottom, left:right]
        sub_img_code = face_recognition.face_encodings(sub_img)
        if len(sub_img_code) != 0:
            face_distances = face_recognition.face_distance(face_encodings, sub_img_code[0])
            print(face_distances)
            index = np.argmin(face_distances)
            name = face_names[index]
            cv2.putText(img, name, (left, top - 20), cv2.FONT_HERSHEY_SIMPLEX, 1, 255, 2)
    cv2.imshow('Face', img)
    if cv2.waitKey(1000 // 12) & 0xff == ord("q"):
        break

cv2.destroyAllWindows()
camera.release()
|
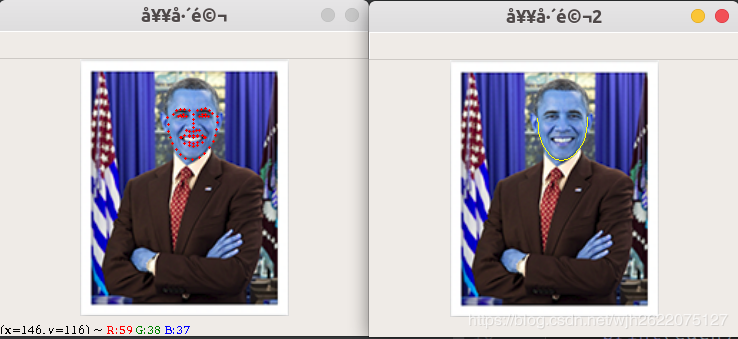
 调用face_recognition.face_landmarks()方法即可得到人脸特征点, 返回一个字典, 下图是返回的数据, 包括chin(下巴), left_eye(左眼)等.
 我画了两种图, 一种是遍历所有的点, 直接给点画图的图(点用实心圆绘制). 第二个是单独画下巴, 连成线, 用的是polylines方法.
 完整代码:
完整代码: